Stable Diffusion, NovelAI, Machine Learning Art - AI art generation discussion and image dump

How the fuck do you use it to take something, like let's say my avatar, put it through img2img and make it enhance the detail of it without changing the shape of it?
If you just want "more detail", you can go to the "Extras" tab in A1111 and just throw the image into an upscaler. Img->img and ControlNet let you generate similar images to a base image without being identical.

Method 1: img->img

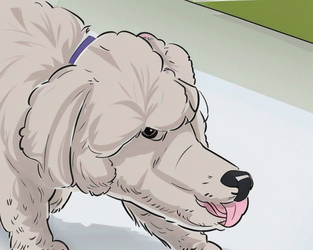
Here's an example slobbermutt I made while playing with img->img, using the standard slobbermutt as the image input.
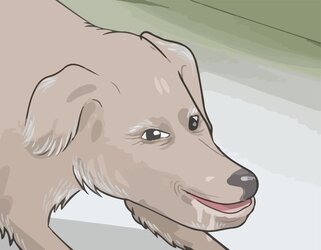
1.jpg01309-2949670874-a light brown dog is walking on the ground with a white background and a gree...png
You can see the full parameters if you drop it into the PNG info tab in A1111, but I'll highlight the important parts.

Prompt: a light brown dog is walking on the ground with a white background and a green background with a white border and a black border, a detailed drawing, furry art, (poodle:1.5), puffy hair, close-up, <lora:WikiHow:0.85>, slobbering, drooling, open mouth
Basically what I wanted it to look like. Note the WikiHow LoRA, since i wanted to copy the WikiHow art style.

Negative prompt: bad-hands-5, bad-image-v2-39000, EasyNegative, text, watermark, low quality, medium quality, blurry, censored, wrinkles, deformed, mutated text, watermark, low quality, medium quality, blurry, censored, wrinkles, deformed, mutated, glasses, asian
Some random negative prompt I copied off CivitAI, some of it was probably useless, like the "bad hands" embedding.

Steps: 35, Sampler: DPM++ 3M SDE Karras, CFG scale: 6, Seed: 2949670874, Size: 640x512, Model hash: 463d6a9fe8, Denoising strength: 0.5, Clip skip: 2, Lora hashes: "WikiHow: 2ca810e36c44", Version: v1.6.0, Hashes: {"embed:EasyNegative": "c74b4e810b", "embed:bad-hands-5": "aa7651be15", "embed:bad-image-v2-39000": "5b9281d7c6"}
Typically 25+ steps is fine. I like SDE Karras. The two most important "knobs" are the CFG scale and the denoising strength. The higher the CFG scale, the more strictly it will try to match the image to the prompt. The denoising strength determines how much it changes the input image. A low denoising strength will give you a very similar image, a high denoising strength will give you a completely different image. Typically you want to experiment and find a sweet spot where it changes the image enough to be interesting, but without making something different.

Method 2: Controlnet
I suck at this honestly when it comes to generating people, animals and such. I'd just go look for a YouTube tutorial or something.

And speaking of ControlNet, how do you set it up to do the funny hidden message images? This is another one of those things that I have zero idea about while I still keep bumblefucking with prompts and generation parameters over a single thing over and over again waiting a minute per image only to realize it's not doing shit to make it look better just as I did back when Stable Diffusion first became big.
Here's the model that seems to work the best. https://civitai.com/models/111006/qr-code-monster

You can make a base image in paint, find one online, or preprocess it with one of the ControlNet preprocessors. For this one I just found a black and white trollface image online and used that. Black text on a white background in paint works great as well.

Here's the controlnet info:
city scenery, sidewalk, railing, office building
Negative prompt: lowres, watermark
Steps: 45, Sampler: DPM++ 3M SDE Karras, CFG scale: 6, Seed: 3339385279, Size: 1024x1024, Model hash: 7f6146b8a9, Clip skip: 2, ControlNet 0: "Module: none, Model: qrCodeMonster_v20 [5e5778cb], Weight: 0.9, Resize Mode: Crop and Resize, Low Vram: False, Guidance Start: 0, Guidance End: 1, Pixel Perfect: True, Control Mode: Balanced", Version: v1.6.0, Hashes: {"model": "7f6146b8a9"}
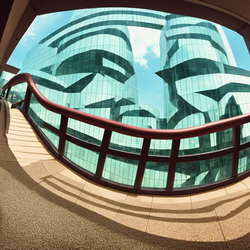
The main thing to adjust here is the control weight. Set it higher to make your output look more like the input.

13167-2518907517-city scenery, sidewalk, railing, office building.png
 
If you just want "more detail", you can go to the "Extras" tab in A1111 and just throw the image into an upscaler. Img->img and ControlNet let you generate similar images to a base image without being identical.
That's the thing: I don't want to just completely redo one image into another. You know how there are LoRA's that add extra detail to what you're generating?
01393-dreamshaper_8-1995 FSO Polonez Caro MR 93 1 6.png01395-dreamshaper_8-1995 FSO Polonez Caro MR 93 1 6.png
I want something like that but having it work on a pre-existing, non-txt2img image. I want it to keep all of the original edges, shapes and colors and only add extra detail to it.
 
may have traumatized my 11yo nephew today (or rather, he may have traumatized himself)

only started using SD on tuesday, ended up using the roop extension as a way to make cheap and easy shitposts in the family whatsapp (by adding their faces in)

the family came round for a birthday, so I showed them how to generate SD stuff for shits and giggles, but accidentally left the computer open after the grown-ups left the room. nephew snuck in and tried to prompt NSFW big booby ladies

unbeknownst to him, roop was enabled and using a picture of my dad (his grandfather), a chubby man in his mid-70's. as such, after waiting in such horny agony that would only be familiar to those of us around in the days of dial-up, he was left with the sort of image that would leave your average former child soldier scarred for life

to be fair, it was pretty funny seeing the results after they all left. not willing to share the images for fear of doxing, but the below is a rough approximation (excluding the bare-breasted variants)


loss of innocence - SFW.png
 
That's the thing: I don't want to just completely redo one image into another. You know how there are LoRA's that add extra detail to what you're generating?

I want something like that but having it work on a pre-existing, non-txt2img image. I want it to keep all of the original edges, shapes and colors and only add extra detail to it.
Img2img and controlnet I think would do what you want. Set the Control Type to Canny, make the text prompt something like
a highly detailed blue car, <lora:more_details:1>
With this lora; https://civitai.com/models/82098/add-more-details-detail-enhancer-tweaker-lora

Eg. I used your first car as input and got this:
01483-2794155893-a highly detailed blue car,  _lora_more_details_1_.png
The output of the canny preprocessor looks like this:
tmpm2dpe4tu.png
So it's keeping the same general structure but enhancing the detail.
 
  • Informative
Reactions: Something Awful
Img2img and controlnet I think would do what you want. Set the Control Type to Canny, make the text prompt something like

With this lora; https://civitai.com/models/82098/add-more-details-detail-enhancer-tweaker-lora

Eg. I used your first car as input and got this:
View attachment 5481611
The output of the canny preprocessor looks like this:
View attachment 5481615
So it's keeping the same general structure but enhancing the detail.
Well, I tried that already, so I guess the only real way to do this is fiddle with the canny preprocessor, correct prompts and all the little parameters. ¯\_(ツ)_/¯
 
Going off my technical understanding of SD: I'd try using a very small amount of added noise in the img2img, along with a prompt that describes the original accurately, with extra words for added detail. This has a good chance of working well because details will be lost in the noise and regenerated, and not the general shape. It's not going to be pixel-perfect obviously, so you could try shooping it into its original shape and img2img'ing it with even less noise, repeating until suitable. Not sure which way the slider goes in A1111, try setting it at like 95%. Iterations can go at a semi-high number. There's also quite a bit of an art to it, so YMMV. The img2img prompt has to ideally generate images identical to the input.

As for alternative methods, I don't know much about control nets or any of the other newfangled SD mods, sorry. Canny preprocessor sounds like it might be good, because it's an edge detector. I have no idea about any of this shit either.
 
Loona has red sclera and white pupils. Her color pallet is mostly whites, blacks and greys with sharper Canines.
TBH I don't know much of the character just that the fandom is undertale-levels of disgusting and I was more focused on getting the BR2049 pose right.

And yeah knowing all that its a bit furry-tier knowledge, you sure she's not looking at your file folders?
 
TBH I don't know much of the character just that the fandom is undertale-levels of disgusting and I was more focused on getting the BR2049 pose right.

And yeah knowing all that its a bit furry-tier knowledge, you sure she's not looking at your file folders?
I was trying to train a LORA on an artist. The artist had a relatively small sample size. Around 20-50 images. For some reason, around 50% of them were Loona. I think it's because she is easy to draw with a relatively small color palette. LORA ended up really weird skewed toward white bodies irregardless of the other samples colors.

Edit:You would be surprised what you can do with LORAs based on furry artists. By adding furry or animal as negative prompts you can get human people with img2img filtering and adding human as a tag. I've posted the results of this a few times in this thread. Furry artists have an insane amount of sample images on average which makes them a prime candidate for LORAs if you can stomach them.
 
Last edited:
Right now I am running ComfyUI with sdXL with a bunch of quality of life add-ons installed and following this guys 30 part series on it, it can be a little complex but the videos are quite informative here is a playlist.

Learn to install add-ons and mods as well as advanced tutorials on inpainting, image to image and even more things that are unique to ComfyAI that A11111 cannot produce.

here is some screenshots of the UI and how easy it is to install modules and various other things with mod manager (you must install mod manager with comfyUI using git)
231v1v231v32.png

This Manager button will only be present along with the other screenshots if you first install mod manager. The tutorial is in the playlist.
23v1213v1v23.png

Easy installation of Modules and Custom Nodes from menu..
231v231v1v32.png
23v1231v123v.png
 
  • Like
Reactions: Vecr
Well, I tried that already, so I guess the only real way to do this is fiddle with the canny preprocessor, correct prompts and all the little parameters. ¯\_(ツ)_/¯
There's a buried setting, "apply color correction to img2img results to match original colors", might be handy for your use case.
 
Back