I not only made an autistic purchase, I will now share an autistic post :]
__________________________
I am happy. My little miniature sit-down arcade that I made out of a 1980s filing cabinet is nearly completely finished, I have recently got all the last parts in the mail and just have to remove the temporary black tape I got on there and spray paint the remaining wooden parts black or maybe red. In the background you can see that BIG6 Genesis pad I preordered and finally got in the mail a little while ago. I think I've already talked about that controller in this thread so I won't ramble about it - edited this to take the pics of them out because I am pretty sure I already posted them and even talked about the smaller Genesis controller too. Anyway. it's my favorite handheld "control pad" of all time for platforming games, though I prefer the arcade stick for everything else...what I wouldn't give though for a legit Genesis pad with analog sticks on the bottom face like a PS4 controller...that would be nice.
 We were talking about working on this cab in chat lol
The cabinet is just a two-drawer filing cabinet. I simply took a stock cheap arcade stick plexiglass that came with Neo Geo MVS art on it and filled it with high quality Sanwa parts and placed the whole thing inside of a cutout on the top of the cabinet and bolted it in. It was very simple to make, and not only is the cabinet weighted down (I put my book collection in the bottom drawer and all my spare arcade parts and small electronics in the top drawer), but it is mounted to a long wide wooden base that stabilizes the entire thing. You can be as rough with this mini-cab as you like and it's not moving an inch. The buttons and lever are perfect, however since I grew up in America, I wanted to have a second alternative fightstick filled with the bulky and concave Suzo-HAPP buttons I remember from my time as a kid in American arcades.
Man. I tell you what...after handling those buttons after 20 years the difference is night and day compared to the Sanwa buttons. These Suzo-HAPPs have
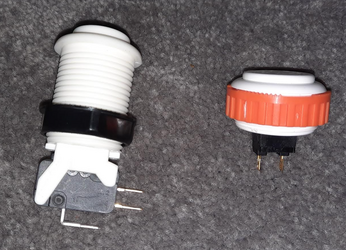
huge travel, these fucking loudass and heavily-tensioned springs inside them, are completely uncomfortable during serious/competitive play and just clunkier to operate overall than the Sanwa buttons. Below I have shown photos of the long, clunky Suzo-HAPP buttons next to the far superior Japanese Sanwa buttons, which have the orange nut and far lower profile. The plunger is larger too, now that I look at them.

 The pickle is an in-joke shh someone will understand it

Anyway. I still wanted to make something with these buttons. I decided on the following project:

I call this a "Microcabinet" because it has enough room inside for its own Emulator system, which is exactly what I am planning on doing with this guy. It will also be able to just be hooked up like a regular arcade stick to anything with a USB port. I realize the current PCB button encoder is a shitty little generic one. I will be upgrading it to a dedicated fight stick board to test just how good those really are - and if they are worth the money. I've never had a fight stick with a good PCB in it so I can update here in this thread when I buy it and let my other arcade nerds know what it is like :]
The current lever is a Sanwa JLF, which is my favorite, with 2 pound spring to really give you some good feedback when you wrench the thing around. Because of the thick wood control panel lid I had to use a longer shaft with a customized sleeve for it to make up the extra length (finding a manufactured long shaft sleeve to buy online is actually near impossible) You can see the clear portion just below the black shaft sleeve that gets hidden by the washer and wood, and in the photo below that once installed it rises above the surface at the perfect height. I got the long shaft just in case this turned out to be an issue and I am glad I did. I dunno how I'd manage to get a Suzo-HAPP lever in this chungus, but I might try some day. I am currently looking for an opaque red dust washer and red sleeve to match the bat top on the lever and having some difficulties...lots of arcade shops are out of stock of lots of little things these days.
Especially certain buttons (ugh)

The current red finish is just the 2X Paint-and-Primer that I sprayed on this evening. The bottom portion of the box will be black. The inspiration for this stick in many ways was really Mortal Kombat, so I am thinking about doing a Mortal Kombat 1 colors fade in with black edges and orange+yellow sunset type fade in from the top. Maybe add some legitimate MK1 or MK2 cabinet art or even just the MK Dragon logo, which would have to be custom made to fit along with the plexiglass because of my custom button layout. With MK being a "block button" fighter instead of a "hold back to block" fighter, and the actual cabinets having an H-shaped button layout with block right in the center, that standard 4-above-4 Neo Geo custom sit down cabinet layout I am running up there at the top of this post is extremely confusing to use when playing the Mortal Kombat series even with remaps. This is compounded even further when playing MK3 and 4, which add a RUN button that is absolutely necessary to use if you want to play those games effectively.
The original MK1, 2, and 3 Control Panel for reference. this is a modern Arcade1UP but the cab looks almost identical to the MK1 cab:

As you can see my button layout for this even uses the traditional Mortal Kombat button colors and so will have the traditional binds: Reds=LP/HP, Blues=LK/HK, White=Block (and the start+select buttons of course), Yellow=Run. The MOST important parts of this layout are the Run button located at the player's thumb and the block button being in the center. I simply slid the punches and kicks up and inward so as to give the stick an overall more "universal" feel when playing other games. There will be two additional buttons for L2 and R2 somewhere on this stick in the future...possibly two black ones placed above the lever, with two white start and select buttons moved to the side or rear. Or vice versa on the colors. idk yet.
I just need to order the three more buttons...as well as my Raspberry Pi (RetroPi) to begin learning how to build a miniature emulator for this. In the meantime I will finish the paint scheme and buy a plexiglass panel to begin cutting the holes in to finish up the cosmetic side of things. I might even just get vinyl for the whole thing idk yet.
I will also need sound dampening on the interior walls - these buttons are fucking LOUD.


