Gaunt King Ithan Rilph
"Sargon is probably the tastiest person" - Josh
True & Honest Fan
kiwifarms.net
- Joined
- Apr 16, 2022
ShareX is a screen recording tool that can capture things in various formats, from png to mp4 and even animated webp. I often use it to create animated webp's from streams the moment something happens, and have been asked a few times on how to set it up. Guide might look lengthy, but it's mostly to make it retard-proof, there aren't that many steps.
Purpose: Screen record > Automatically uploads > Clipboard gets filled with a direct link to the upload, including img tags for sneedchat. (Will work just as well for regular png captures, no additional setup required).
Demonstration:
1: Download ShareX, it's open source and uses ffmpeg for encoding.
2: Add a custom uploader (the default ones aren't ideal), I recommend imgbb for various reasons.
2.1: You can export the basic uploader settings from this repository (just copy the code).
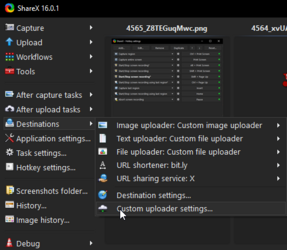
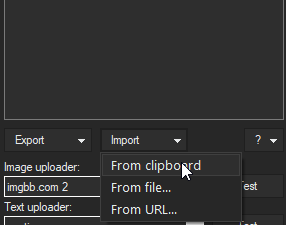
2.2: Go to custom uploader settings and import from clipboard.
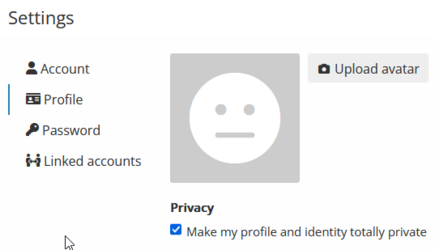
2.3: Make an account on imgbb (accepts temporary email services) and proceed to get your API key. (Optionally, set your account to private)
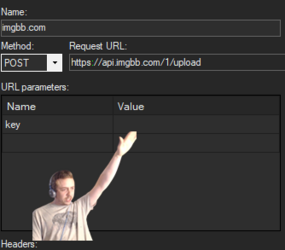
2.4: Delete the text in the Value bracket and paste your API key from the previous step.
(imgbb might limit API keys based on use to prevent botting, after ~2500 uploads mine stopped working, but you can simply go to step 2.3 and request a new API key without making a new account)
Now your file hosting is set up, next step is automating it.
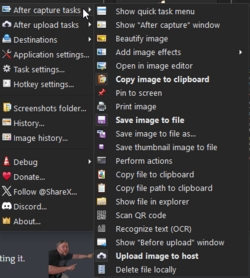
3: Go to "After capture tasks" and select "Upload image to host".
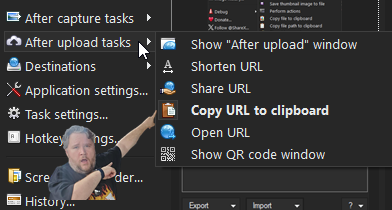
3.1: Go to "After upload tasks" and select "Copy URL to clipboard".
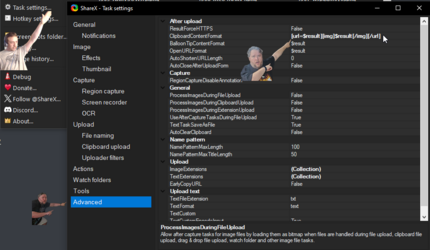
3.2: Go to Task settings... > Advanced and paste the following into "ClipboardContentFormat".
(This is mainly for sneedchat, and the url part is optional. If you leave it as "$result", you'll simply get a direct link)
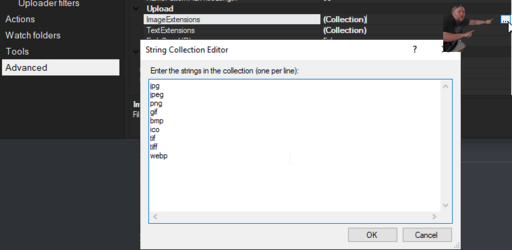
3.3: Stay on the same page and click the square in ImageExtensions, add "webp" to the list that pops up.
Almost done, time to set up a hotkey for animated webp recording. Default hotkeys for regular mp4 recording will already exist.
4: Go to Hotkey settings... > Add... > Screen record > Start/Stop screen recording.
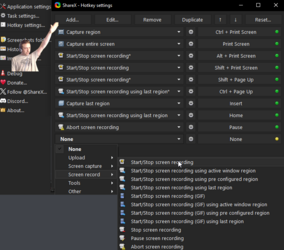
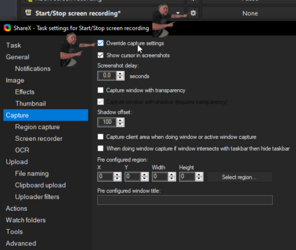
4.1: Click the cog on your new hotkey and navigate to Capture and check the "Override capture settings" (this is so you can record in different formats depending on which hotkey you use).
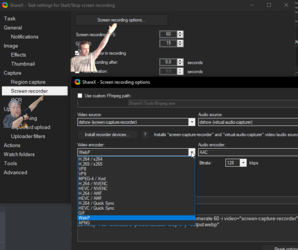
4.2: Go to "Screen recorder" and click "Screen recording options...", click "Video encoder" and select webp. (You might need to click "Install recorder devices" just above and set video source to "screen-capture-recorder).
Practically done, the rest are (recommended) quality of life additions.
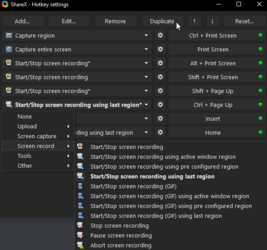
5: Quality of life hotkeys! Go back to hotkeys and duplicate the hotkey you just finished setting up, change the new one to "Start/Stop screen recording using last region", you can also add an "Abort screen recording" hotkey.
5.1: Change file naming system to what suits you. Go to "Task settings..." > "File naming". I like having an incremental number at the start (easy 'sort by name' in folder) followed by randomized letters.
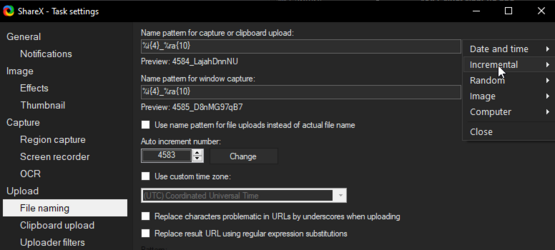
5.2: Custom stickers! (screenshots only, don't work for recording). Create a folder and add pictures, when taking a screenshot, click the smiley in the toolbar and have your custom folder selected.
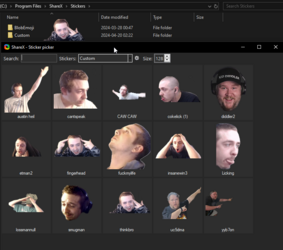
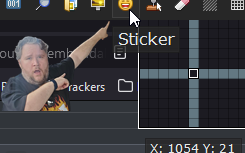
Purpose: Screen record > Automatically uploads > Clipboard gets filled with a direct link to the upload, including img tags for sneedchat. (Will work just as well for regular png captures, no additional setup required).
Demonstration:
1: Download ShareX, it's open source and uses ffmpeg for encoding.
2: Add a custom uploader (the default ones aren't ideal), I recommend imgbb for various reasons.
2.1: You can export the basic uploader settings from this repository (just copy the code).
2.2: Go to custom uploader settings and import from clipboard.


2.3: Make an account on imgbb (accepts temporary email services) and proceed to get your API key. (Optionally, set your account to private)

2.4: Delete the text in the Value bracket and paste your API key from the previous step.

(imgbb might limit API keys based on use to prevent botting, after ~2500 uploads mine stopped working, but you can simply go to step 2.3 and request a new API key without making a new account)
Now your file hosting is set up, next step is automating it.
3: Go to "After capture tasks" and select "Upload image to host".

3.1: Go to "After upload tasks" and select "Copy URL to clipboard".

3.2: Go to Task settings... > Advanced and paste the following into "ClipboardContentFormat".
Code:
[url=$result][img]$result[/img][/url]
3.3: Stay on the same page and click the square in ImageExtensions, add "webp" to the list that pops up.

Almost done, time to set up a hotkey for animated webp recording. Default hotkeys for regular mp4 recording will already exist.
4: Go to Hotkey settings... > Add... > Screen record > Start/Stop screen recording.

4.1: Click the cog on your new hotkey and navigate to Capture and check the "Override capture settings" (this is so you can record in different formats depending on which hotkey you use).

4.2: Go to "Screen recorder" and click "Screen recording options...", click "Video encoder" and select webp. (You might need to click "Install recorder devices" just above and set video source to "screen-capture-recorder).

Practically done, the rest are (recommended) quality of life additions.
5: Quality of life hotkeys! Go back to hotkeys and duplicate the hotkey you just finished setting up, change the new one to "Start/Stop screen recording using last region", you can also add an "Abort screen recording" hotkey.

5.1: Change file naming system to what suits you. Go to "Task settings..." > "File naming". I like having an incremental number at the start (easy 'sort by name' in folder) followed by randomized letters.

5.2: Custom stickers! (screenshots only, don't work for recording). Create a folder and add pictures, when taking a screenshot, click the smiley in the toolbar and have your custom folder selected.


Last edited:

